My drive to Halifax was beautiful, a stunning Spring morning with incredible views over the Yorkshire moors. If you don’t already know this part of Yorkshire it’s a mix of dramatic landscapes studded with sturdy old mill towns boasting powerful Victorian architecture. This is a vibrant town with plenty going on - look out for Dean Clough Mills which are well worth a visit whilst you are there. ‘Wicked Gen’ runs her fused glass and enamelling on copper courses in the huge basement rooms of her home. She has everything organised and after brief introductions, sets out clear safety guidelines about using the materials and kilns and protecting our hands and eyes before we get down to 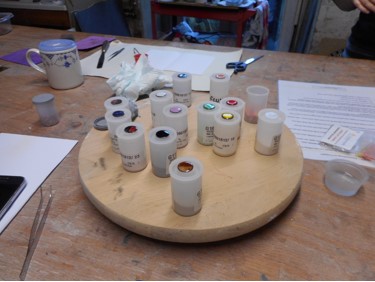 any craft work. Her knowledge and enthusiasm are very evident right from the start and she has a quiet authority that inspires confidence.
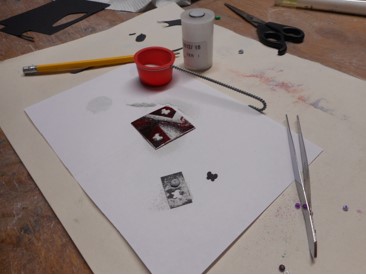
Keeping the workstation clean is essential as the tiny glass granules can easily become mixed and contaminate the purity of colours. Everything - paper, palette knife, small sieve and the copper piece must be kept as clean as possible. Gen shows us how to fold our white paper so that the crease makes a space to allow us to lift the copper, without it tipping, using a palette knife. We all use a pre-prepared copper shape that can be a key fob or pendant and start by cleaning it with an abrasive sponge on a separate mat, once it’s clean and dry we can start. We apply the first dusting of very fine granules , they can be transparent or opaque if we wish, that will become our background colour. We carefully put the powder into the small sieve and shake it on  to the copper, gently tapping the sieve with the palette knife. Gen explains that it works best to start round the edges and then sprinkle evenly across the surface of the copper. Once we are all ready we watch as Gen shows us how to lift the copper on to a wire mesh for the first firing – a job for a steady hand.
The safety precautions for using the kilns comes next and we have to pay careful attention. Gen fires the kiln at 830 degrees, experience has shown her that this works best, and she demonstrates how to hold the long fork that will be used to lift the mesh and place it towards the back of the kiln without tipping it. The heat inside the kiln is intense and we feel the blast of it as the door opens - so keeping hands well clear of any metal parts is paramount. The first firing is for one minute at 830 degrees and then the copper is lifted out and left to cool for about five minutes. All hot metal must stay by the kilns and never be taken to the work stations until it can comfortably be held by hand – an essential rule.
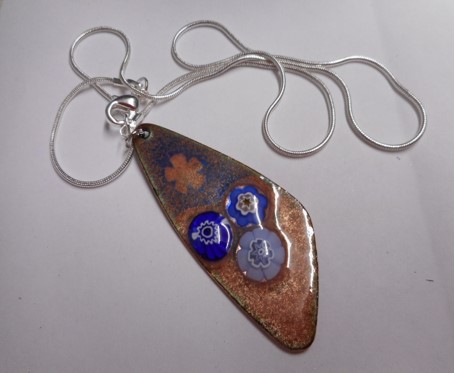
Once cooled we clean the underside of the copper using a damp carborundum stone and then choose the finish we desire for it. The bits of mixed up coloured granules that have been stored in small tubes give a really unusual mottled effect and are popular – nothing is wasted as  these materials are expensive. The second firing is done on a trivet to keep both sides clean so again Gen shows us how to place our copper securely, ready to lift into the kiln. My hand shakes and my copper piece drops off but, not to worry, Gen quickly has me doing it all again and successfully this time. Gen reminds me to keep my work tools clean so colours are not lost – even the tiniest specks of ‘dust’ will show after the firing.
Now we can build a design by cutting paper templates and carefully placing them on the copper. We can use Gen’s various hole punches or cut our own shapes or simply lay the paper straight to mask off a section of the copper that we want to leave clear – everyone tries different ideas. The trick is to have a tiny dob of blu tack on the upper side of the paper shape so it can be lifted off using tweezers – another job for steady hands. Colours are applied and the copper is fired again – each time there is a magical transformation – and we are beginning to learn how the process works and to gain some confidence.
I have to be honest here. I don’t have any artistic talents and I’ve always been a clumsy clutz so this is not that easy for me. However Gen calmly inspires me and it’s completely absorbing and I love it. How better to spend a Saturday than with interesting people learning some 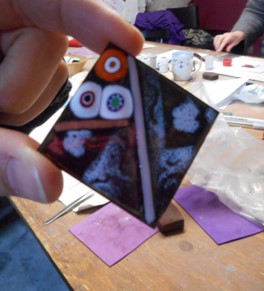 new fascinating skills? Believe me, if you arrive with your head full of other stuff it will all soon be chased away as you get to grips with your project. A perfect example of active absorption being a brilliant means to calming stress release!
By now we are all working independently as we continue applying colours or milifiore – tiny shaped & coloured beads- or seed beads -which are placed individually using a specialised firing glue that leaves no trace. Gen is keeping a watchful eye on us and offers advice & reminders as required, always with great attention to the safe use of the two kilns. Students who come regularly naturally build up some expertise and confidence and Gen really encourages people to utilise all the various materials she can offer – just to see what happens. The time has flown by and, once my key fob is finished, I quickly make a start on a small square using some different colours just to see how they look. I know I’ll have to come again as this taster session has given me a bit of insight as to the process and lots of ideas for future projects.