By Rachael Whitfield
My eldest daughter is a big fan of making her own beauty products and I often find her in my kitchen helping herself to my store cupboard ingredients to make a face scrub, face mask, moisturiser, lip scrub, etc. So, I knew she was the perfect candidate to help me on my venture into soapmaking.
We were still in lockdown and so attending an in-person course was not possible, but that wasn't a barrier as we chose an online course from Keri at the Soap Coach. Keri’s online soap course consists of two video tutorials, one for cold process soap making and one for hot process and a handy written guide to accompany the videos with recipes and suggested reputable suppliers of soap ingredients.
 Handmade soaps by The Soap Coach
As per Keri’s advice we sat down and watched both videos first to decide which soap method we wanted to follow. The videos are a brilliant step-by-step guide to making soap presented in a clear and easy to understand manner. Each video is just 25 minutes long but conveys all you need to know to make soap safely and successfully at home.
 Safety first! Kitted up for handling lye
We opted for the cold process method, consulted Keri’s recipes and ordered a few of the ingredients that we didn’t have from the online suppliers recommended. Keri advocates using natural ingredients for colouring and I would definitely try that next time, but whilst we were browsing online we were rather taken with a sparkly mica powder so we ordered that as our colouring agent.
Warning: you do need caustic soda (also known as sodium hydroxide, lye) for the saponification process so following the safety advice is important. We had some already but you can purchase it from DIY stores.
I was a little concerned about using the caustic soda but Keri demonstrates how to use this in a completely safe way.
And don’t worry, your finished soap does not contain caustic soda, it evaporates in the chemical reaction when you mix it with your oils and is only required in order for saponification to take place. So, that’s the science bit explained!
 Our chosen blend of essential oils (patchouli and orange), our colourant and dried flower petals for decorating
With our ingredients and utensils all sorted we were ready to go!
The actual soapmaking process is not complicated but you do need to keep an eye on having your ingredients at the right temperature and blending the products together in the right order. We started off mixing our caustic soda with water and leaving that to cool. Then melting the cocoa butter and coconut oil and allowing those to cool also.
Cocoa butter smells just like chocolate, so we’re already off to a good start!
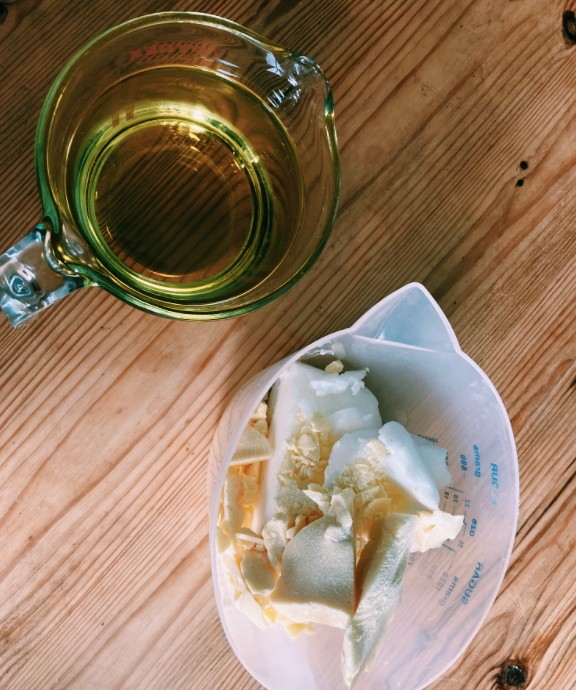 Olive oil, coconut oil and cocoa butter
We followed the video through step by step as we went, but whilst we waited for our oils and caustic soda to cool and be within the correct temperature radius of each other we took the opportunity to watch the video through all the way to the end. Neither of us had made soap before so it was good to be sure that we knew what to do at each stage.
Once the caustic soda and oils were at the right temperature we were ready to blend them together. We used a stick blender to combine, added our essential oils and blended again, then poured out a little of the mixture to blend with our colourant so that we could make a 2 tone soap.
(To be honest I slightly overblended the soap and it went past the ideal trace point for making soap with swirls in it, but it was my first attempt so I’m not going to beat myself up about it!)
Then we poured the soap into plastic containers which I had lined with greaseproof paper to make removal easier. We made one batch in a simple two tone layered effect and the the other batch had a swirl pattern with dried petals on top. Then we left them to set...
 Soap mixture poured into its mould and decorated with dried flowers
About 48 hours later we removed the soaps from the containers to slice them, and no one was more surprised than me that our soap making was a total success! We cut them up into even-ish bars (a bit more practice required there too) and now the only drawback is that we have to wait 4-6 weeks for the excess water to evaporate before we can use them.
 Patience... 4-6 weeks drying time before they can be used!
Soapmaking was great fun and I totally recommend Keri’s online course. We got to do something creative together, smell delicious, reduced our plastic use, made a natural product where we know exactly what has gone into it, and even have some extras that we can give to friends. All from the comfort and safety of our own home. It’s a win-win!
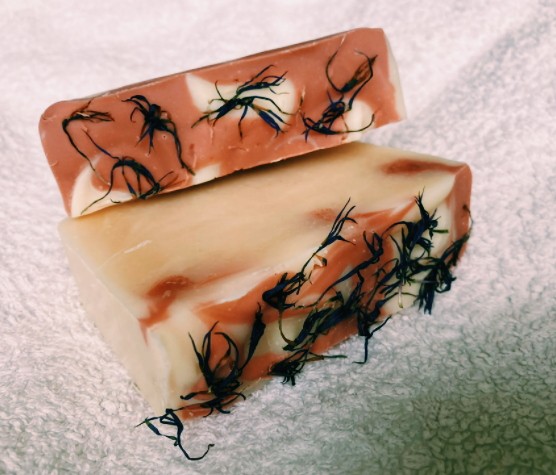 Our final bars of soap
To try Keri's online soapmaking course you can order it here.
You can also browse other soapmaking courses or check out all of the other creative options for crafting at home here.
Plus, if you enjoyed reading this have a browse of all of our recent lockdown articles >